 Microsoft’s Windows 7 is an awesome Operating System. It’s bringing back all the glory that Microsoft lost with the release of Windows Vista OS. Several thousands of early adopters participated in testing phases (Beta & RC) of Windows 7 and most of them are running on Windows 7 RC now. I’m one such happy Windows 7 RC user :)
As the Windows 7 RC is set to expire sometime in the mid of 2010, these users should upgrade to Windows 7 final version at one point are other.
Microsoft is not supporting direct upgrade of RC to final version. If we run the upgrade process, we will be greeted with the following message and the installer terminates
You can’t upgrade this prerelease version of Windows 7. Go online to see how to install Windows 7 and keep your files and settings.
But luckily there is a simple trick that bypasses this version checking system and perform smooth upgrade without loosing any data or programs.
Here are the simple steps to be followed:
- Copy files of Windows 7 DVD to your local hard disk or external drive (If you got an Windows 7 ISO file then use 7-Zip app to extract the ISO).
- Browse to the sources directory.
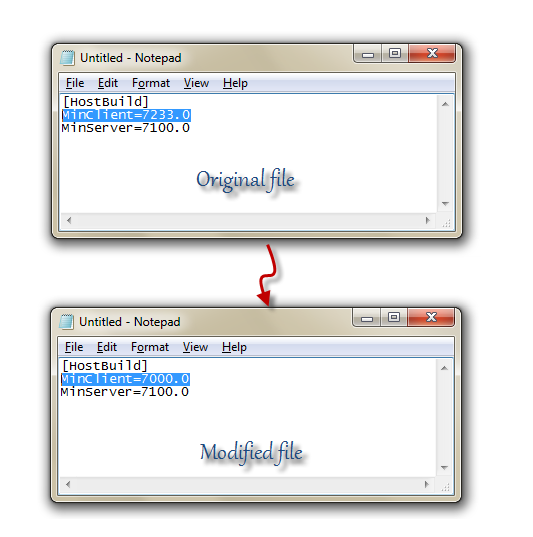
- Open the file cversion.ini in a text editor like Notepad.
- Modify the MinClient build number to a value to 7000 (pictured below).
- Save the file in place with the same name.
- Run setup like you would normally from this modified copy of the image and the version check will be bypassed.

Note: As Windows 7 Beta & RC are Ultimate editions of Windows 7, we can only upgrade them to the final release of Windows 7 Ultimate edition. So you cant upgrade Windows 7 RC to Window 7 Starter or Home Premium or Professional editions the upgrade.
